Purpose
The
Loan Debugger is an innovative, user-friendly
diagnostic tool. Unlike the standard
diagnostic tools that
come with Encompass by default, the Loan
Debugger evaluates actions and performance in
real-time. This allows administrators to catch
errors as they occur, with the ability to determine the prior actions that could have caused the error. The tool also provides a
summary section detailing errors, triggers,
calcs and field population.
Activating the Loan Debugger Pro
Before using the Debugger, create the following folder on your computer, if
it doesn't already exist:
C:\EncompassLog\DebugLog.
Loan Debugger Pro is activated by
double-clicking the silver target
icon in the bottom-right hand corner of the
screen.

The Loan Debugger Pro options and testing screen will open. The user can select the debug mode that best suits their current debugging task. The user can run Performance Tests to assist is selecting the debugging mode that is best for them.
If the purpose of using the PowerTool is to review processing times, it is possible to further limit the overhead added by having the Debugger running. Any, or all, of the options below can be selected for any Mode to more closely replicate system performance when the Tool is disabled.
As an example - below are the results of the Set Field 500 times test for each of the 4 possible modes.
Disabled
Standard
Faster
Ultra
The "Run All Tests" allows the user to run and compare the results of all tests in one window which shows previous test results and where a new set can be run. Running all tests takes a few minutes, as indicated by the popup message. The results pane displays the results for all tests and for each mode.
If Loan Debugger is activated without a loan open, Performance Tests are not enabled.
Loan Debugger Pro options can be changed by accessing the menu by right-clicking on the icon. Click "Debug Options" to change the Debug Mode or the Disable the Debugger.
Deactivating the Loan Debugger Pro
Loan Debugger Pro will be deactivated when Encompass is closed. The tool can also be closed by right-clicking on the icon, selecting Debug Options, selecting Disable Diagnostics, and clicking Close.
Using the Loan Debugger Pro
Once the tool is activated, open a loan and
click the target icon in the bottom-right
hand corner of the screen. This time the
icon will be blue.

Loan Debugger Pro will launch in a separate window.
Important Events Section (Top-Left)
The Important Events panel in the top-left
hand
corner of the debugger window is a running list of events that have
taken place involving the loan file. We recommend you check the "ignore common errors" checkbox on the top left.
Loan Debugging and Troubleshooting
The Events Panel is the area where the user can monitor, in real-time, changes that occur as the loan is being updated. Each event shows forms that are opened, fields that are changed, business rules that are run, and system events that occur.
One of the most important features of the Loan Debugger Pro is the ability to track every event that occurs when there is a change to a loan. If an event, such as a field value change, causes other events to occur, the events are grouped in a tree-like structure. This allows the user to follow the path of each change and the reason that the change occurred.
Loan Debugger Pro displays an audit-trail like view of changes to field values. This allows the user to follow the trail of changes to a field, and easily determine which event caused the field to be set to a particular value. Filtering the Event Viewer on the targeted field isolates the list, making it easier for the user to follow the field changes.
Loan Debugger Pro also calculates the elapsed time of each event and group of events. This information is invaluable to administrators attempting to determine if a calculation or business rule is causing latency in the loan. Note that the time will be affected by the Debug Mode selected. If performing this type of analysis, we recommend setting Loan Debugger Pro to "Faster" or "ULTRA".
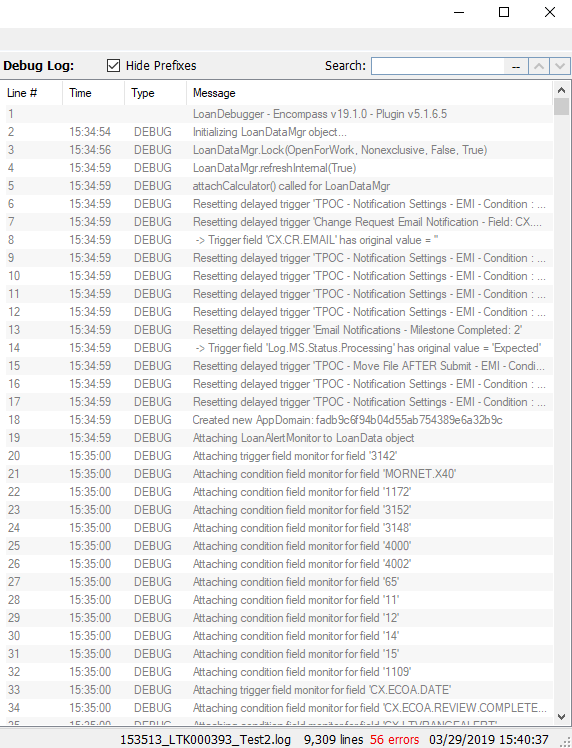
Debug Log (Top-Right)
The
Debug Log is the primary diagnostic tool that
shows line-by-line code execution
results. This is similar to the Ellie
Mae diagnostic tool except that it can be
viewed in real-time as changes are
being made to the loan file. The Loan
Debugger log updates anytime a change occurs
in the loan file (automatically or
manually). Selecting any event line in the Important Events section will select the line in the Debug Log section where that event occurred. This assist the user by displaying the actual system event. The user can then easily navigate between events before and after to further investigate the issue.

A useful feature of the Debug Log is that any
lines that contain errors or
exceptions are highlighted in red.

Summary Section (Bottom-Left)
The
section in the bottom-left hand corner of the
window is a summary section with
the following tabs: Errors, Triggers,
Calcs and Fields. The Errors tab shows a list of runtime
errors compiled (in order) from the time that
the loan was opened. The Triggers tab is a list of field trigger rules
that have
executed since the file was opened. The Calcs tab is a list of field
calculations that have taken place and the Fields tab is a list of fields that
have been automatically
populated/updated.

This product installs the following:
Plugins
LoanDebuggerProPlugin3.dll (version 6.0.0.1 - updated 3/21/24)
CDO
LoanDebuggerProPlugin3LicenseKey.txt
