DESCRIPTION:
This plugin is used for sending a wire request by sending loan data and documents to the Northpointe servers via Encompass using either HTTPS or HTTPS+SFTP.
INSTALLATION:
- Download the zip file of the plugin from https://empkg.s3-us-west-2.amazonaws.com/NorthPointe_v1060_no_Settings.zip
- Unzip the zip file you just downloaded and take note of where you placed the contents of the file.
- Login to Input Form Builder as a Super Administrator.
- Click on Tools->Package Import Wizard...
- Click the "Browse.." button and locate the "NorthPointe_v1060_no_Settings.empkg" file that was unzipped from the zip file in step 1. Select the file and click the "Open" button.
- Click the "Next >" button
- Click the "Import" button
- If you receive any popups saying a resource already exists, check the "Apply this decision to all" box and then click the "Yes" button for each popup.
- You should receive a "Package import completed successfully" popup. Click the "OK" button.
- Another popup will appear that says "Would you like to open the imported forms in the editor?". Click the "No" button.
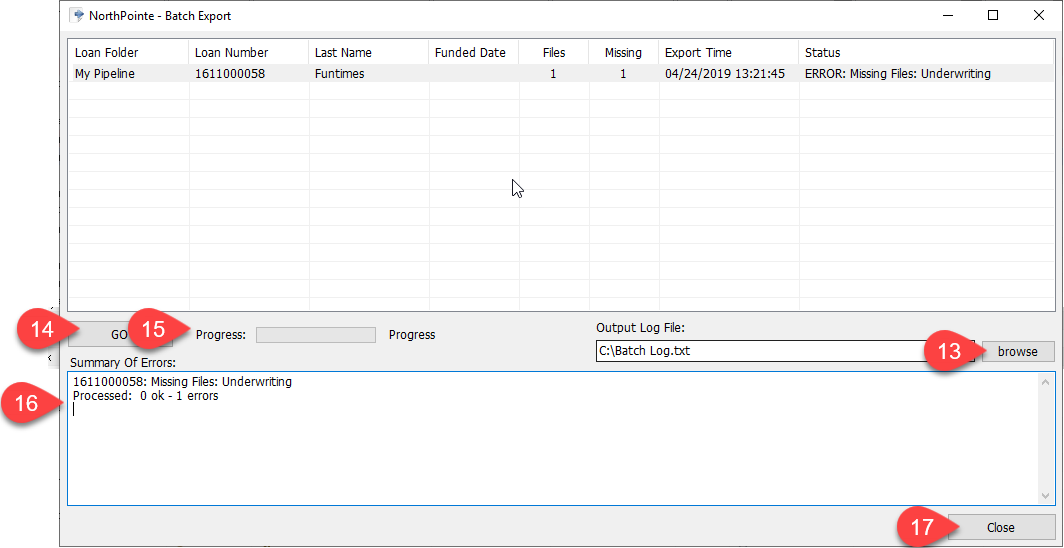
- The plugin is now installed. Exit Input Form Builder.
CONFIGURATION:
- Login to the Encompass you installed the plugin on using a Super Administrator login.
- Click the "Encompass" menu and choose "NorthPointe Loan Export->Settings". (Note: only Super Administrators will be able to see the "Settings" menu item).
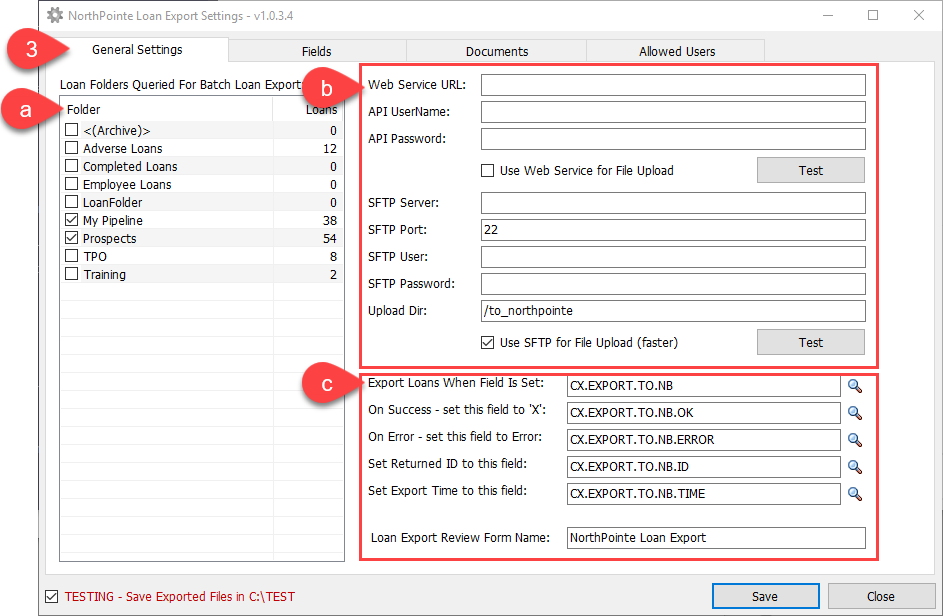
- "General Settings" tab:
- In the "Loan Folders Queried For Batch Loan Export" column on the left hand side, choose which folders you want the plugin to look for loans to include in the batch export. All other folders will be ignored, even if the loans in those folders have the correct trigger field set.
- On the right hand side, fill out the web service authentication information. You will need to get this information from NorthPointe. You have the option of only using the web service or using the web service and the SFTP server. Using the SFTP server for your file uploads is faster so it is recommended you do that. Check the "Use SFTP for File Upload" checkbox to use SFTP, otherwise check the "Use Web Service for File Upload" checkbox. Once you have your credentials entered, click the "Test" buttons to make sure they work. You should receive a "Success" popup if the credentials are correct.
- The items in this section are the fields associated with the plugin. Before using the plugin, you must add these fields to the reporting database. Choose which fields you want interacting with the plugin:Export Loans When Field Is Set: This is the field that will trigger the loan to be added to the batch export. To mark the loan as exportable in the next batch, you can create a field trigger to set this field automatically.On Success - set this field to 'X': Once the loan has been exported, NorthPointe will send back a response. If that response is "Success", this field will set to "X".On Error - set this field to Error: If the response from NorthPointe is "Error", this field will be populating with the word "Error".Set Returned ID to this field: The ID of the API transaction that NorthPointe responds with will be set to this field.Set Export Time to this field: The date and time the loan was successfully export to NorthPointe will be recorded to this field ID.Loan Export Review Form Name: This field is set to "NorthPointe Loan Export" by default and is the name of the form that shows all the values of the above fields. If you change the name of the form, record it to this field. We need form name because there's an "error report" accessible either through the menu or through the Form itself. This will query RDB for all loans with Error field set and show a list. Double-clicking any loan in the error list will open the loan and automatically go to the form that is defined in this field. As such if anything is needed for funder to review, these items should also be placed on thatform.
- In the "Loan Folders Queried For Batch Loan Export" column on the left hand side, choose which folders you want the plugin to look for loans to include in the batch export. All other folders will be ignored, even if the loans in those folders have the correct trigger field set.
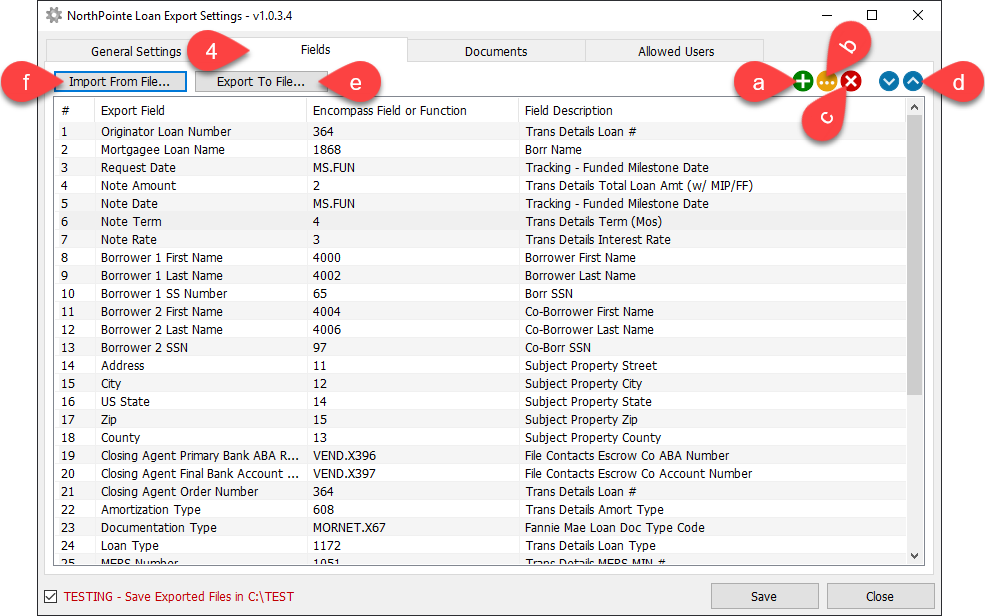
- "Fields" tab - This tab is where you define which fields you want to send to NorthPointe. NorthPointe's field mapping will appear here by default, but you have the option to edit these fields if anything changes.
- To add a field, click the "+" icon on the top right. An "Add New Field Map" popup will appear. Populate the input areas with the field data you want to add and then click "OK":Export Field: This is the name of the field you will be sending to NorthPointe. Populate it with a value that can easily identifies what the field is.Radio Buttons: Choose whether this is an Encompass Field, a Fixed Value, or a Special Function.Encompass Field: For Encompass fields, type in the field ID of the field you want to send. If you do not know the field ID, you can click on the magnifying glass to search for the field ID.Field Type: This will automatically populate with what kind of field it is. Example: STRING.Field Description: This will automatically populate with the Encompass field description for the selected field.Fixed Value Field: If you want to send the same value with every loan to NorthPointe, select Fixed Value and type in the value you want to send.Special Function Field: If you want to use a prebuilt function for the field value, select this radio button and choose which function you want to use Example: Selected "Special_FtpFileName" will send the name of the files with the post.

- To edit an existing field, either double click a field in the list or select the field and click the yellow button on the top right.
- To delete an existing field, select a field and click the red "X" button on the top right of the screen.
- To change the order in which the fields are sent, select which field you want to move and then click either the blue up arrow button or the blue down arrow button on the top right of the screen.
- If you would like to export the field list, click the "Export to File..." button, find where you want to save it, name the file, and click the "Save" button.
- To import a list of fields from an XML file, click the "Import From File..." button, locate the XML file on your hard drive, and click "Open". The XML file must be in the same format as an exported field list from the previous step.
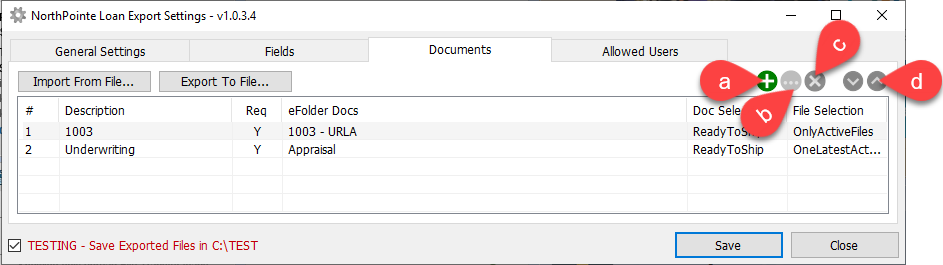
- "Documents" tab - This is the tab where you define which documents you want to transfer over to NorthPointe with the loan.
- To add a document, click the "+" icon on the top right. An "Add New Document Map" popup will appear. Populate the input areas with the field data you want to add and then click "OK":
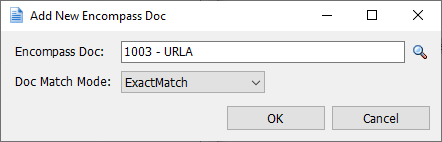
 Description: This is the description of the set of documents you'd like to include. Pick a name that describes the set of documents as a whole.Required: Check this box to make sure at least one of the documents is present in Encompass. I.E. if you put "1003" and "1003 Alternative" - there will be an error if there are no such documents, but there will not be an error if one of these two documents is in the loanEncompass Docs: This is a list of Encompass documents you would like to include with this set. To add a new document, click the "+" sign on the top right. Another popup will appear that says "Add New Encompass Doc" and populate the following fields:
- Encompass Doc: This is the name of the Encompass document to include. Click the magnifying glass icon to the right of this field to search for an existing document.
- Doc Match Mode: This is the match mode to follow the Encompass Doc you chose. Choose "ExactMatch" to match the name exactly, "StartWith" to match to what the Encompass document starts with, or "Keywords" to match words inside the Encompass document titles.
- Click "OK" when you're done choosing the encompass document.
 Doc Attachment Filter: This filter allows you to only include documents with certain tracking statuses checked. If the chosen tracking status has not been met, the document will not be included. If the "required" checkbox for the document set (from the earlier step) was checked, this would cause the export to fail. Choose from the following:
- AllDocs: The document will be included not matter what status is checked.
- Reviewed: The tracking status "Reviewed" must be checked for the document to be included.
- ReadyToShip: The tracking status "Ready to Ship" must be checked for the document to be included.
Doc Attachment Filter: An eFolder document can be comprised of many attachments/files. This field allows you to select which attachments will be included in the export to NorthPointe. Select one of the following values:- AllFiles: Every file included in the eFolder document will be included in the export.
- OnlyActiveFiles: Only files with the "Current Version" checkbox checked will be included in the export.
- OneLatestFile: Only the most recent file will be included in the loan export (only one file). It does not matter if the file has been marked as "Current Version" or not.
- OneLatestActiveFile: Only the most recent file (only one file) that has been marked as the "Current Version" will be included in the loan export.
- Encompass Doc: This is the name of the Encompass document to include. Click the magnifying glass icon to the right of this field to search for an existing document.
- To edit a document, either double click a document or click the yellow button on the top right.
- To delete a document, select the document you wish to delete and click the red button on the top right.
- To change the document order, click the blue up/down arrows on the top right.
- "Allowed Users" tab - This is the tab where you will setup user permissions for the "NorthPointe Loan Export" menu. By default, all super admins will always see the "NorthPointe Loan Export" menu. Under this tab, you can define individual users and/or personas that can see or not see the menu.
- First Section - bypass individual user ID's. Any user ID added here will never see the "NorthPointe Loan Export" menu, even if there are other rules that might allow them.Add User Button - Click the icon on the top right of this section that looks like a person with a plus icon to add a user. When you click on it, a list of users will popup. Select the user you do not want to see the menu and click the "Add" button. You can search the users by typing in a name or user ID in the top right "Filter" field.Delete User Button - To delete a user, select the user you want to delete from the list and click the gray "X" icon on the top right.
- Second Section - Enable individual user ID's. This section works exactly the same way as the first section, but the user's you add in this section will be able to see the "NorthPointe Loan Export" menu. If you add a user ID in this section that is also in the first section, the first section will take precedence and the user will not see the menu item.
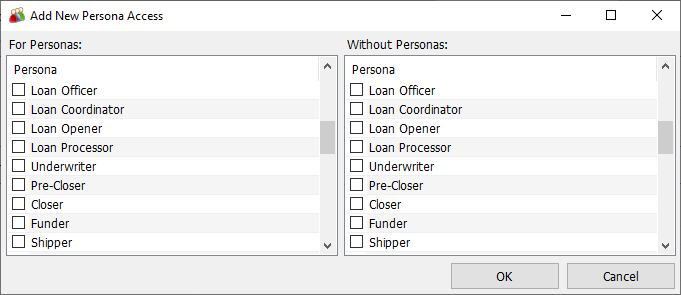
- Third Section - Enable menu item for entire personas. All users that belong to the persona you add to this section will be able to see the "NorthPointe Loan Export" menu. If there is user from the added persona was also added to the first section, the user will not be able to see the menu.Add Persona Button - Click the icon on the top right that looks like a group of people with a plus icon on top of it to add a persona. When you click on it, a window will popup that will allow you to configure the setup.Add New Persona Access Popup Windows - To enable access for all users that have a persona, check the box next to each persona you'd like to allow in the "For Personas" column. To enable access for all users that do not have a persona, check the box next to each persona in the "Without Personas" column. For example, if you would like all users to have access to the "NorthPointe Loan Export" menu that are not part of the "Loan Officer" persona, you would check "Loan Officer" in the "Without Personas" column. When finished, click "OK" to save the selected personas. To cancel, press the "Cancel" button and the personas will be disregarded.
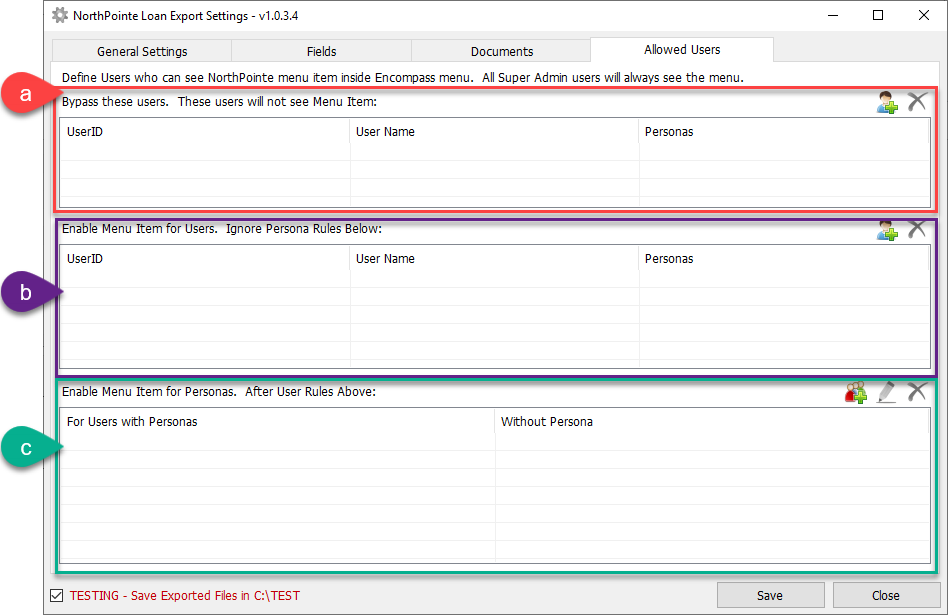
- Allowed Admins tab - This tab was later added after this documentation and is why you do not see it in the previous screenshots. This tab works exactly like the "Allowed Users" tab, but the users/personas added here will be able to see and edit the "NorthPointe Loan Export->Settings" menu item.
- On the bottom left of the tabs, there is a checkbox that says "TESTING - Save Exported Files in C:\TEST". If you would like to save a copy of the PDF's that are being transferred from Encompass to NorthPointe, check this box. Copies of each PDF will then be saved in the "C:\TEST\" directory. This will give you the ability to see how the plugin combines PDF files into one.
- To Save your changes and close the settings window, click the "Save" button.
- To close the settings window without saving your changes, click the "Close" button.
USING THE PLUGIN:
Once the plugin has been installed and configured, it will be ready to use. To start a new batch export to NorthPointe:
- You must first prepare your loan files for the batch export. According to our configuration, loans will be added to a batch if they are in the My Pipeline folder or the Prospects folder, and they will be queued up to export when the "CX.EXPORT.TO.NB.OK" field is set to "X" (Note: Document requirements must also be satisfied). For this process, you can either automate "CX.EXPORT.TO.NB.OK" by writing a business rule field trigger or have your users manually check that field on the "NorthPointe Loan Export" input form. When that field gets set, the loan will try to batch export. This example will be covering the manual method of checking the field.
- Open the loan file you would like to add to your batch export.
- Navigate to the "NorthPointe Loan Export" input form.
- Check the "CX.EXPORT.TO.NB" checkbox.
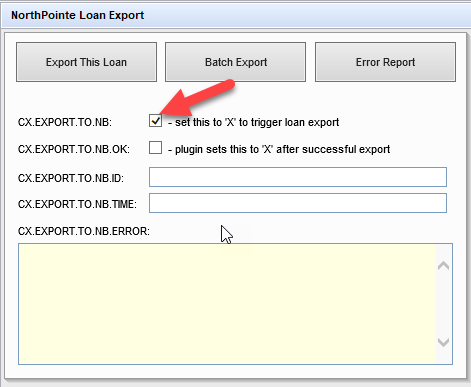
- Save the loan file. The loan is now queued up for the batch export process. Repeat steps 2-5 for each loan you'd like to include in the batch.
- Document requirements must also be met for each loan, however. In the beginning of these usage instructions, you were given a sample of required documents. We will go through the steps of adding those here. (Note: this document adding process should happen naturally in your workflow before you send a wire request for the loan. We are only showing you here so you're clear how the configuration settings relate to the documents).
- In the same loan file, open the eFolder.
- We are requiring one document to be added to the loan for the loan to export. We define what documents are required during the configuration stage above. Here is the document we configured:Document: 1003 - URLARequired: YesDoc Selection: ReadyToShipFile Selection: OneLatestActiveFileBecause we configured the plugin to require this document, it must be present in the eFolder with a file attached for the loan to be included in the batch export
- Add the "1003 - URLA" document to the eFolder and upload a PDF as the attachment.
- Doc Selection Filter: We have "ReadyToShip" set for this filter. That means the "Ready to Ship" status in the tracking section must be checked for this document to be valid.
- File Selection Filter: We have "OneLatestActiveFile" set for this filter. That means only the latest attachment inside this document that is marked as "Current Version" will be sent.

- Doc Selection Filter: We have "ReadyToShip" set for this filter. That means the "Ready to Ship" status in the tracking section must be checked for this document to be valid.
- Close out of the eFolder and save the loan file. Repeat this process as needed in the other loan files that are part of the batch.
- You are now ready to run the batch! To do so, exit out of your loan files and from the Encompass menu, click >NorthPointe Loan Export->Batch Export.
- A window will appear with a list of loans to be exported. Each loan in this list is a loan that has been queued up to be exported to NorthPointe. The criteria for these loans is as follows (each criteria must be met):
- Export loan field that is defined in the settings = NOT BLANK (Default field ID is CX.EXPORT.TO.NB)
- On success field that is defined in the settings = BLANK (Default field ID is CX.EXPORT.TO.NB.OK)
- Funding Funds Release Number = BLANK (Field ID is 2000)
- Loan must be in one of the folders defined in the
“settings” menu
- Under "Output Log File" click browse and choose a location to save the output log file.
- If the list of loans looks accurate, click the "Go" button. The batch will now run and the loans will export to NorthPointe.
- The progress bar will show you how many loans have exported and what percent the batch has completed.
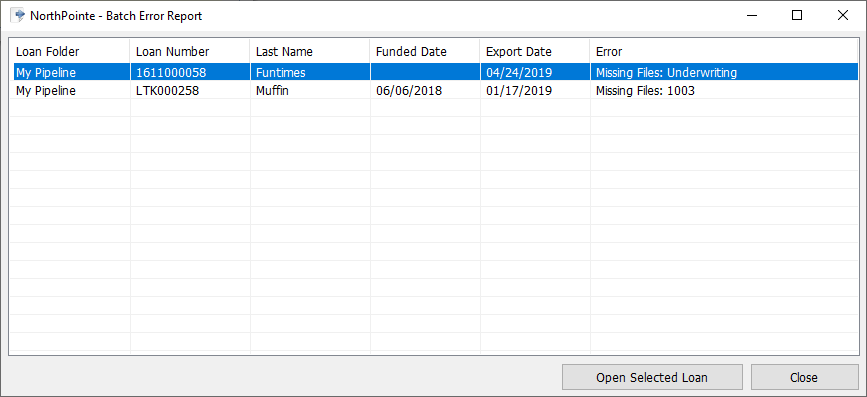
- The "Summary Of Errors" box - Loans will have the error field (defined in the initial configuration) set if any errors are encountered in the batch export. A list of those loans will appear in this box as well as in the error report for potential review and correction. There are several types of errors. I.E. 1) Expired credentials - user will need to
enter new credentials, clear all errors and resubmit. 2) missing data - user
will need to review loan and change values, 3) temporary Northpointe glitches -
user will need to see if a call to Northpointe is needed, etc
- Click "Close" to exit
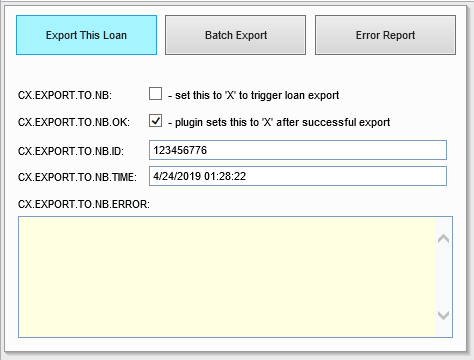
- Once the batch has been completed, all loans that were successfully exported will have the fields on the NorthPointe Loan Export input form filled out. You can use these fields in your reporting (once you add them to the reporting database) or for simple validation that the loan was exported. The form will look similar to this once the loan has successfully exported:
- To a history of all errors of the batch export, click on the Encompass menu and "NorthPointe Loan Export->Error Report". A window will appear and show you an overall history of errors. You can click any error and click the "Open Selected Loan" button to open the loan file associated with the error.