

Purpose
The audit screen was created to give lenders a more flexible interface for managing their conditions. Currently, the plugin integrates with the eFolder only for Post Closing conditions, but you may use the audit screen plugin for managing any kind of itemized list. Only post close audits will be duplicated to the eFolder, however.
Installation
To install and activate this plugin:
- Contact Lender Toolkit for the Encompass Package (EMPKG) file.
- Login to input form builder as an administrator.
- Click Tools->Package Import Wizard...
- Click the browse button and find the EMPKG file you received from step one.
- Click the Next button and then Click the Import button.
- If you receive any popups to overwrite existing information, click "Yes".
- When done, click OK and exit out of Input Form Builder.
Configuration
The audit screen plugin requires an initial configuration. It saves non-PII audit data to an external SQL database that LenderToolkit manages on AWS. To configure, login to Encompass as an admin, open any loan (preferable a test loan), and navigate to the "LTK - Audit Screen" input form. Once there, click the gear icon on the top right (next to the save button).
Admin Settings Screen:
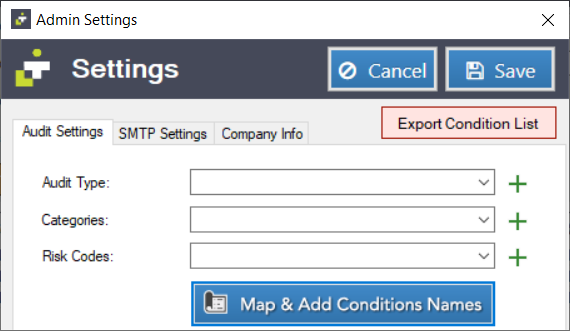
Audit Settings Tab
This is where you set up all the audit types, categories, and risk codes for the plugin. Users cannot free type this information inside the audit so you must predefine it. We prepopulate some of this data by default, but you have the ability to expand it further.
- Audit Type: This is where you define the types of audits. By default, it is populated with "Post Closing", "3rd Party", and "Quality Control". Note: only Post Closing audits integrate with the eFolder. To add a new audit type, type in the name of the audit type in the drop down and click the "+" icon to the right of the audit type box.
- Categories: Every condition in your audit can fall into a different category. This is where you define those categories. To add a new category, type the name of the category in the drop down and click the "+" icon to the right of the categories box.
- Risk Codes: Users can define a risk code/risk level to each condition on the audit. This will tell other users the importance of the condition. By default, we prepopulate this list with "NA", "Informational", "Low", "Medium", "High", and "Critical". Whichever condition has the highest risk code will set the overall risk for the audit (only if predefined risk codes are used). It will also highlight the audit with blue/orange/yellow/red depending on how critical the risk code is.
- Map & Add Condition Names: You will need to define what conditions are available for the users to select and then map the conditions names to the audit type and category you want them associated with. To do this, click the "Map & Add Condition Names" button.
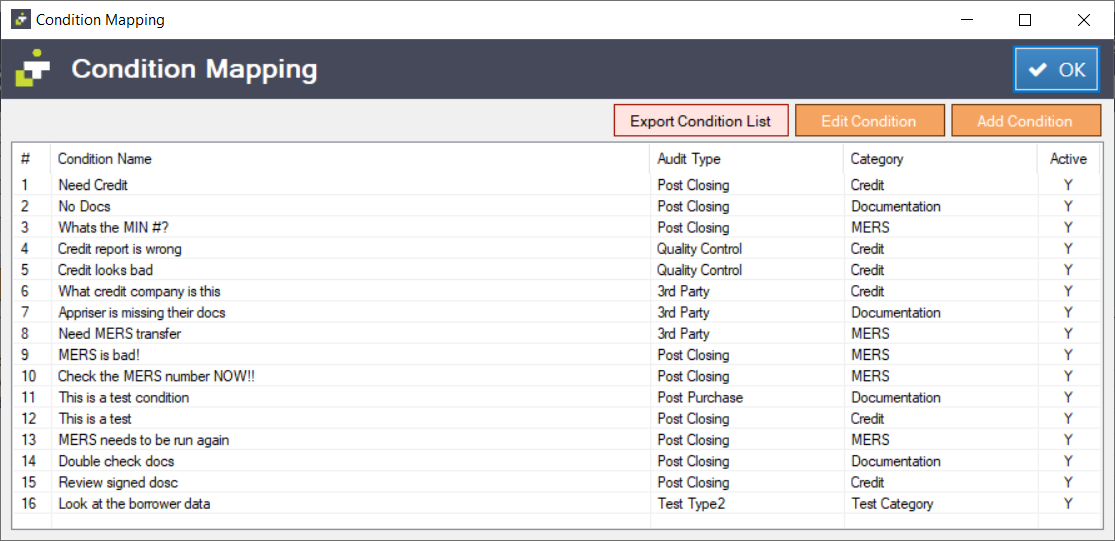
Add/Edit Condition:
- Click the "Add Condition" button on the top right to add a condition or select a condition from the list and click the "Edit Condition" button.
- Type the name of the condition in the condition field.
- Select which audit type this condition maps to. Note: if this condition maps to several audit types, you will need to create additional condition entries.
- Select the category the condition maps to. Note: if this condition maps to several categories, you will need to create additional condition entries.
- Check the "Active" box if you want the condition to display in the condition list. You can uncheck this box if you're not ready for users to use this condition.
- Click the save button.
- Repeat the process for all conditions. If you have an excel spreadsheet of all conditions and their mappings, Lender Toolkit may facilitate a batch import. Email support@lendertoolkit.com

Exporting Conditions: To export a spreadsheet of all your conditions, click the "Export Condition" list button.
SMTP Settings Tab: In order to send email notification from the audit screen plugin, you must fill out the SMTP Settings.
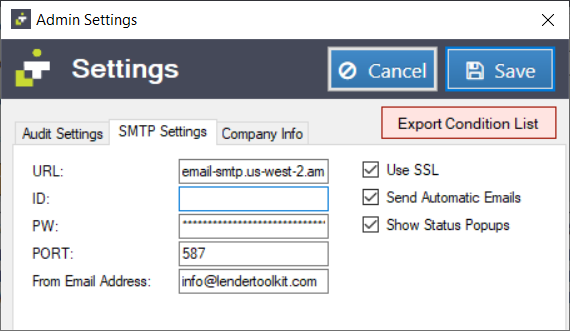
- URL: This is the host of your SMTP Server
- ID: This is the ID for the SMTP account you want to use
- PW: This is the password for the SMTP account you want to use
- Port: This is the port your SMTP server uses
- From Email Address: This is the address you want to send emails from.
- Use SSL: Check this box if your SMTP server requires SSL
- Send Automatic Emails: Check this box if you want the plugin to automatically send emails when documents are added to the conditions in the eFolder and when responses are added to the conditions.
- Show Status Popups: Check this box to alert your users via an alert box when an automatic email notification goes out.
Company Info Tab:
This tab has details about your company that will display on the email notifications that go out.
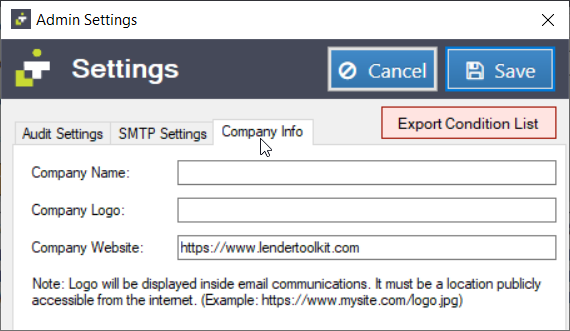
- Company Name: Type in your company name here
- Company Logo: Type in the web address to a photo of your company logo (we do not support uploading a logo via the plugin)
- Company Website: The URL to your company website
Your plugin is now configured. Click "Save" and restart your Encompass before use to ensure the settings apply.
Instructions for Use
Main Screen:

To use the plugin, open the "LTK - Audit Screen" input form. A new window (pictured above) will then appear.
- Audit Date: The date of the audit. This will be blank by default so you can exclude audits with no date from your BI. You may either populate this manually or this date will auto-populate when you add your first condition.
- Reviewed Date: This is the date the audit was reviewed. This field supports manual entry only.
- Responses Due: This is the date the responses are due on the conditions.
- Notifications Last Sent: This is the date notifications were last to users on the conditions. It will populate whenever someone clicks "Send Notifications".
- Defects Observed By: This is the user that started the audit. It will populate manually. To clear it out, click the X on the right of the field. This user is the user that will be notified on the automatic email notifications when a document gets added to the eFolder or a response is added to a condition.
- Type of Audit: This is the audit type. You can configure which audit types are available in the settings. Once a condition has been added to an audit, you cannot change this field, it will be locked.
- Audit Completed Date: This is the date the audit was completed. You can either manually populate it or it will auto-populate when all conditions have been cleared.
- Responses Closed: This is the date responses will be closed. If today's date is after this date, users will be unable to add responses to the conditions.
- Investor: This is a read only field. It is the investor name from the loan file and is for your reference only.
- CC List (CSV): This is a comma separated list of email addresses you want CCed on the email notifications. An example value would be: info@lendertoolkit.com,support@lendertoolkit.com,admin@lendertoolkit.com
- Audit #: This is the audit number you are currently on. You can have as many audits as you want. To change which audit you are on, select it from this dropdown.
- Add new audit icon: Click this icon button to add a new audit to the loan file. The Audit # field will increment when this button is clicked.
- Overall Risk: This is a read only field. It will show the most critical risk code from the conditions. Example: if 2 conditions have Low for the risk code and one condition has Criticalfor the risk code, this field will color in red and say "Critical"
- Send Notifications Button: Click this button to send notifications to all the roles on the conditions that were set to be notified. SMTP Settings are required for this to work. Upon clicking, email notifications will go out and the Notifications Last Sent date will populate.
- Add Condition: Click this button to add a new condition (see detailed instructions below)
- Edit Condition: Select a condition from the list and click this button to edit the condition (see detailed instructions below).
- Delete Condition: Select a condition from the list and click this button to delete it from the audit.
- Settings Button: Click this button to display the audit screen admin settings (details above).
- Save Button: Click this button to save your audit. Note: This will also save the loan file.
Add/Edit Condition Screen:
When you click the "Edit Condition" button on the main screen, the following form will appear. If you click "Add Condition", the same form will appear, but the responses section on the right will not be visible.
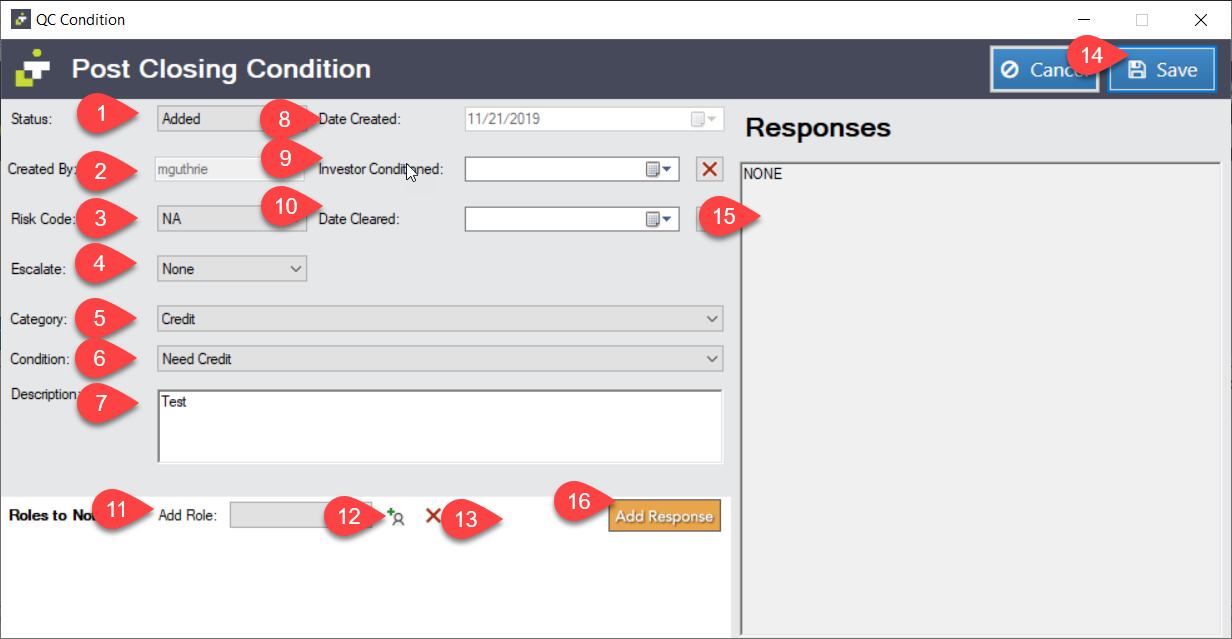
- Status: This is the current status of the condition. If this is a post closing audit, the condition will also get added to the eFolder upon save under Post Closing Conditions. This status will map back to that eFolder condition. Whenever you update the status either here or in the eFolder, the statuses will synchronize. Note: the "Waived" status maps to the "Cleared" status in the eFolder.
- Created by: This is a read-only field that will auto-populate with the Encompass user ID of who created the condition.
- Risk Code: This is the risk assigned to the condition. You can predefine risk codes from the settings. The condition with the highest risk code will map back to the overall risk code on the main screen.
- Escalate: Choose which level you'd like to escalate the condition to. This doesn't have any further functionality other than what the user can see.
- Category: Choose which category the condition belongs to. You can predefine this list in the settings. When you change the category, the list of conditions dropdown will update with the conditions that are mapped to this audit type and category.
- Condition: Choose the condition name from this dropdown. You can predefine this list in the settings. If this is a post close condition, this will map back to the eFolder item on the name field. If this field is updated either here or in the eFolder, the values will sync up so you won't have to enter it twice.
- Description: This is a free type field where users can put a description in their own words for the condition. If this is a post close condition, this will map back to the eFolder item on the description field. If this field is updated either here or in the eFolder, the values will sync up so you won't have to enter it twice.
- Date Created: This is the date the condition was created. It will auto-populate when you create the condition.
- Investor Conditioned: This is the date the investor was conditioned. This field must manually be populated.
- Date Cleared: This is the date the condition was cleared. You can either manually choose this or it will auto-populate when the "Cleared" status is chosen. Note: once populated, you cannot change the condition status.
- Roles to notify - Add Role: Choose a role you want notified when the Send Notifications button is clicked on the Main Screen. To add a role, choose them from this dropdown and click the add role icon (12). To delete a role, choose the role again from this drop down and click the delete role icon (13).
- Add Role Icon: Click this button once a role is selected from the dropdown (11) to add a role to be notified when the "Send Notifications" button is clicked on the main screen.
- Delete Role Icon: Click this button once a role is selected from the dropdown (11) to delete a notification role.
- Save Button: Click this button to save the condition
- Responses area: This area is only available when editing a condition. It will display all the responses that users have added to the condition (See below for details how to add a response).
- Add Response Button: This button is only available when editing a condition. Click it to add a response to the condition.
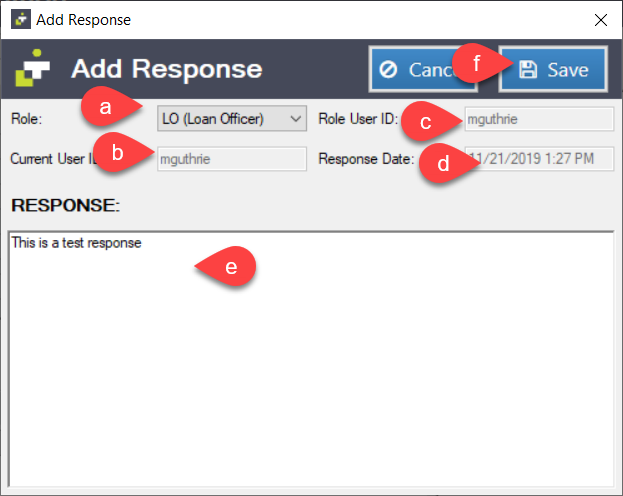
a. Role Dropdown: Choose the role you want to leave a response from from this dropdown.
b. Current User ID: This is a read only field. It will tell you the user ID of who left the response (if it's different from the role user ID).
c. Role User ID: This is a read only field and will auto-populate with the user ID of the who is assigned to the role when you choose a role from the dropdown (a).
d. Response Date: This is a read only field. It will display the date the response was left.
e. Response: Type your response here.
Note: When a response is left on a condition, an automatic email notification will go out (if auto emails are turned on in the settings) to the defects observed by user on the main screen.